Augmenting images
Deep learning requires large data sets and a common strategy to increase the amount of image data is to augment the data set with randomly transformed copies, e.g. rotated or blurred.
AugmentImage takes input images and performs with a given probability
image transformations with randomly chosen parameter settings. The following,
code fragment defines an augmentation where images in sample column 0, with
a probability of 10% are rotated by a random angle between -10 and +10 degrees,
or blurred by randomly adjusting the contrast (0.7, …, 1.0):
augment = (AugmentImage(0)
           .by('rotate', 0.1, [-10,+10])
           .by('contrast ', 0.1, [0.7, 1.0]))
Augmentation are just randomly applied transformation and the supported
transformations are those provided by TransformImage – including
custom registered transformation. Call help(TransformImage.by) for an overview.
Note that the parameter values for transformations are uniformly sampled
from the specified ranges, e.g. -10 and +10 degrees, and that augmentations
are applied independently. Here, image rotation or contrast adjustment each occur
with 10% probability and consequently only 20% of the input images are
actually transformed and outputted by AugmentImage.
We can easily increase the number of augmented images by augmenting within a higher probability and values > 1 are treated as multipliers. For instance, the following excerpt generates 3 randomly rotated images for each input image:
augment_image = AugmentImage(0).by('rotate', 3, [0, 360])
samples >> read_image >> augment_image >> ... >> Collect()
Sometimes it is useful to not apply transformations independently but to combine augmentations. The following example first flips images horizontally and vertically (with probability 1), and then randomly changes contrast with probability 0.5:
augment_flip = AugmentImage(0).by('fliplr', 1).by('flipud', 1)
augment_contrast = AugmentImage(0).by('contrast ', 0.5, [0.7, 1.0])
samples >> read_image >> augment_flip >> augment_contrast >> ... >> Collect()
Now we get flipped images with changes in contrast. Note that augment_flip alone
would double our data but the subsequent augment_contrast with probability 50%
halves it again, resulting in roughly the same number of augmented images as we have original images. If we want to pass through the original images unaltered as well,
we can use identical:
AugmentImage(0).by('identical', 1).by('brightness ', 0.5, [0.7, 1.3])
In the above example, AugmentImage always outputs the original image and with
50% chance an additional image with changed brightness.
Image augmentation can also be applied to samples that contain more than one image, for example and image and its mask. The important feature here is, that the same random augmentation is applied to both images of a sample. For instance, in the case of a rotational augmentation we need to randomly rotate, but image and mask by the same degree! The following example assumes that image and mask are in sample columns 0 and 1 and would with 50% chance rotate them together:
read_image = ReadImage((0,1))
rotate = AugmentImage((0,1)).by('rotate', 0.5, [0, 360])
samples >> read_image >> rotate >> ... >> Consume()
If an independent transformation is needed the augmentation can be divided into two parts. Here we rotate image and mask together but change the contrast of image (in sample column 0) only:
read_image = ReadImage((0,1))
augment_rotate = AugmentImage((0,1)).by('rotate', 0.5, [0, 360])
augment_contrast = AugmentImage(0).by('contrast ', 0.5, [0.7, 1.0])

samples >> read_image >> augment_rotate >> augment_contrast >> ... >> Consume()
Let us conclude this section with a complete piece of code that can be executed.
We read a single sample containing a color image and the corresponding monochrome
image (similar to a mask). Both images are resized to 128x128 by TransformImage.
We then generate 100 samples with randomly rotated images using aug_rotate,
followed by two times of a random contrast change of the image in sample column 0:
samples = [('nut_color.jpg', 'nut_monochrome.jpg'),]
imagepath = 'tests/data/img_formats/*'
read_images = ReadImage((0,1), imagepath)
resize = TransformImage((0,1)).by('resize', 128, 128)
aug_rotate = AugmentImage((0,1)).by('rotate', 100, [0,90])
aug_contrast = AugmentImage(0).by('contrast', 2, [0.3,1])
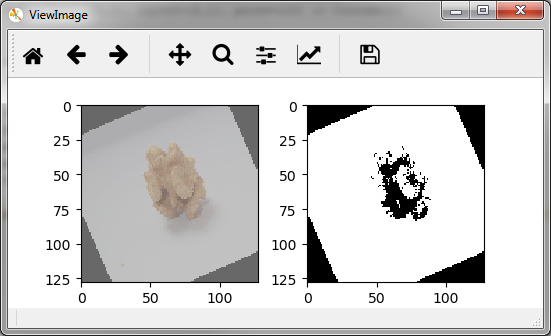
view_images = ViewImage((0,1), pause=1)
samples >> read_images >> resize >> aug_rotate >> aug_contrast >> view_images >> Consume()
This will result in 200 augmented samples (derived from a single sample) that
are displayed via view_images . You should see a window similar to the following,
which gets updated every second (or press any key to progress immediately).
The next step after reading, transforming and augmenting data is typically the
construction of mini-batches for training. The next section describes the
BuildBatch nut that is used for this purpose.